Sunday, January 20, 2013

Sewing first

So as you may have noticed I jump from craft to craft, this time it was sewing. I made a conscientious decision to not purchase a dress from a store for my command Christmas party so I went hunting for an easy dress to make. I Google searched and looked on Pinterest and ran across SewPetiteGal.

She created this simple and easy to make dress that I loved.

But of course two things happened, it didn't come out the way I wanted it to and I had other visions in my mind of what I wanted it to look like in the end. 
I followed her instructions and made the one shoulder dress, which was fine, but for some reason I am fasinated with trains (maybe because it makes me look shorter! Sure that's what I will tell myself!!) So I added one some kind of way. (Needless to say it didn't look good)
this is the color of the fabric I chose. The blue interlock of course for the dress and the organza for the train I decided to add. This is how it turned out...
||
||
||
||
||
||
                                                                               \\ //
                                                                                \/

not cute!
So I started playing around with the sewing machine (by the way the dress is only the third thing I ever tried putting stitches in by machine) and laying the fabric on my body different ways and landed a great look. So I added jewelry and took funny photos!

                         sexy huh!!                                   

But that wasn't good enough! Then it turned into this.....
 still not too bad, but there's that train again!!

But after a couple hours for a couple days I decided I can be myself. I want a sexy retro look with a new twist. All those years of seeing 1930's, 40's and 50's movies I wanted to be old school beautiful.
So I bought long black gloves, rhinestone jewelry (bracelets, earrings, necklace and rings) and pinned my hair up and under like the lady in 007 Skyfall. I even jeweled the shoes. All in all I love the dress I made and I felt beautiful in it.


   and I made a poncho style coat!!


Learned a few sewing things but all in all I was more than happy.
Thanks to my friends Kay and TooReal for putting up with the emails asking for their opinions!!


Monday, August 6, 2012

Strawberry-Kiwi cupcakes

So it has been quite some time since I have shared my creations. This time around I made sure to make a photo/video journal of the kitchen mayhem I created! These cupcakes were a thought to put my two favorite fruits together, which has already been done in drinks, so why not a cupcake.

FRESH INGREDIENTS, CUPCAKES MADE FROM SCRATCH.

As usual my husband and co-worker are my taste tester! At work I have them fill out little critique cards, I can't get better unless I know what is wrong. I think they hate the cards but haven't received any bad critiques. So here it is....


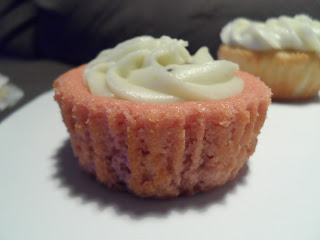
Three variations of a Strawberry-Kiwi cupcake.
*All three variations had kiwi frosting in order to add the kiwi flavor.

I decided to do a (1) Strawberry cupcake, a (2) Yellow cupcake with Strawberry compote and a (3) Strawberry soda cupcake


(1) STRAWBERRY CUPCAKE

I used the syrup, from the strawberry compote as well as more fresh 
strawberries when I made the cake batter.


(2) YELLOW CAKE WITH STRAWBERRY COMPOTE

I make the strawberry compote prior to baking the cupcakes as the cupcakes bake I slightly chill the compote. After both the cupcakes and compote chill I remove about 1/2 inch from the center of the cupcakes and pack down the remaining center, so that the compote does not seep through the bottom of the cupcakes. Then pour compote, ensure the liquid goes in first and then the fruit pieces.
you can either use a fruit/veggie corer (left) or the end of a potato peeler(right)


after the compote is poured in your cupcakes, this is what it will look like. 


(3)STRAWBERRY SODA


The Strawberry soda cupcake was made with just that strawberry soda! Of course I made a simple white cake batter and substituted less sugar and no baking powder for the soda.

So there it is 3 versions of a strawberry cupcake. The soda version more than likely can be used with a boxed cake mix and the compote version is probably best suited for those who like strawberries but do not LOVE them.


Saturday, June 18, 2011

The retirement cake

Okay so it has been a couple months since I made my chiefs retirement cake. But her it is. It was a full sheet cake, half strawberry and half cannoli cake. The writing is very child like and well my rice cereal treat molds were much better than when I first tried to make it. I am not super proud of the final product but I was happy with it, I am a little hard on myself only because it does not look as professional as a normal retirement cake. I am happy because the family was happy. Because of this cake I am surely making plans to take the 2 week Wilton decorating school and get a diploma in Pastries at the Art institute of Virginia Beach.


I made a "dixie cap" with the name of his first ship and tried to make a chief's cover. Around the edge of the cake I used Ghirardelli Dark Cocoa chips. Once again I thank Mr. Hickman and his family for allowing me to make a cake for such a momentous occasion.

Friday, May 27, 2011

Something new....Something small....Something easy??!

So have you ever seen something so cute? These are the new fad "Cake Pops". They are bite size cake in many shapes and colors. The one above is a wonderful creation from "Bakerella", she has been seen on Martha Stewart for her tasty and sight entising cake pops. More of her edible art can be seen on http://www.bakerella.com/ . Anyway I searched to find an easy recipe to try and trust me there were many to choose from, so the decision was a little harder than I had presumed. I eventually decided to just use the Wilton videos from Youtube and put my own twist to it. I decided to make chocolate pops. I started with my own homemade cake batter and used Nutella instead of frosting to form the shapes. I must say when I first shaped them they didn't look very appealing.

But I kept working on them I know in the end they were going to be one of two things, tasty or beautiful, and well by the looks of things I sure hope tasty! Well I have learned if you don't follow the instructions, everything they tell you it may NOT end well. My first mistake was the type of stick I used to make the pops. I did not take the time to purchase lollipop sticks, instead I decided to maintain my frugal-ness and use skewers. Well they don't hold up very well, the cake rounds just kinda slipped down the stick. It seemed that that was the begining of my issues. I had noting to hold up the pops after inserting the stick so that I could decorate them. Next mistake is marshmallo fluff! Well I did know that fluff doesn't harden like regular marshmallow. That was a mess trying to dip and watching it drip.
As you can see I tried to use a deep fryer pan to hold up the pops, this is when I learned the fall off the sticks for being too long. So I chopped down the sticks and dipped them in chocolate, my oh my did they look much better.I was afraid that the chocolate was not going to harden like I wanted them to but alas it looked much better, by the time I finished dipping the last pop the first one had already began to harden. This time I used some styrofoam that came from my new laptop box. Worked wonders for me. 


Well I got my icing, tried a couple different tips to decorate and went to work. I have to work on maintaing a steady hand but I guess I will learn that when I finally take a decorating class. Until then I will keep playing around to perfect my home made recipes. But I hope you like the photos below. I must say I knew they were tasty, shucks, pretty much anything made with Nutella is going to be good. But I am glad they came out just as beautiful.


In the end the recipe was quite easy but you must always follow directions and much easier if I had the correct tools.

Sunday, May 8, 2011

Crafts

Well thanks to allfreesewing.com I am learing to sew(a little) and have been abke to do minor crafts through hand stitching. I currently own a Janome sewing machine and have been practicing the very basics. I leared how to break the machine down and clean it. I have learned how to properly thread it and can some what sew a straight line. The peddle is still a little tricky and I have to adjust the pressure of my foot depending on the type of shoe I am wearing at that time.
Now because i struggle with it and waiting to get into an evening or weekend sewing class to learn I am sticking with hand sewing. All Free Sewing has so man tutorials, patterns ideas, and ebooks for me to learn from. One of the videos I watched was very basic, it taught how to thread a needle, an easy way to knot the ends, I learned two basic hand stitches all with out a condesending tone from the teachers. I do not plan to be a clothing designer or anything, but i would like to be able to create from patterns, for my children. Or make a couple things for myself!

So the first thing I have tried was a fabric flower. I can use it as a brooch, a hair accessory or just simply add it to pretty much anything to add flair. They were extremely easy to make and can be any size for any project. Check out the photo, and tell me what you think.
Published with Blogger-droid v1.6.8

Tuesday, May 3, 2011

Retirement ceremony

Much appreciation to my, now retired, ITC Hickman for allowing me to be a part of one of the most honorable ceremonies of Navy traditions.

I was blessed to showcase my beggining baking skills and baked a delicious sheet cake. It was half strawberry and have cannoli cake, just like his farewell party. I sculpted to Navy covets, the dixie cap and the chief cover, and placed it on top the cake. I have only heard good reviews on my cake and aspire to only get better.

I was also given the honor of being a presenter during the ceremony. Althought it may not sound important, to me it is an honor to sit in the same area as the guest speaker, the retiree and the presiding officer. My job was simple hand the presiding officer and the command master chief the honors being awarded to either Chief or to his family.

It was also a great privilidge to meet his family and not be limited to small talk. Once again Chief if you are reading this thank you for all that you have done for me to keep my head above water and the maintain the joy of soon becoming a professional baker. You have a wonderful family and hope to work with you in the civilian world.
Published with Blogger-droid v1.6.8

Thursday, April 14, 2011

Rice Krispies?


So this past weekend I decided to practice making and shaping Rice Krispies treats(RKT), for two reasons, I saw a cool R.K treat Easter egg and I thought my boys would love that and I need to know hold to scuplt for an important cake. Let first start by saying, before this weekend I had NEVER made a RKT, or had a home made one. I followed the directions, but it seemed way to sticky, so I added more cereal...still too sticky. I left it in the fridge thinking "oh it will be less sticky when it 'settles'! What was I thinking? When what settles? Its rice cereal, melted marshmallow and a tad bit of butter, there's nothibg to settle! So any way later that day I decided let me try to sculpt this hat. I am trying to scuplt two Navy covers, a dixie cup (the all white navy hat that the men wear ) and a Chiefs' cover. I never made it to the Chiefs' cover but I did learn that I need the treats to be a little sticky to shape and mold by hand. So I did what I could, dirty iced it and covered it with my homemade fondant. The picture is shown above, you tell me how bad it looks! Time to make it again this weekend! PRACTICE MAKES PERFECT (or at least better!) This picture was taken a day after it was made. By the way I learned my kids will eat anything because they ate the leftover RK with no hesitation.
Published with Blogger-droid v1.6.8